Navigation: Setting up >
Configuration Wizard
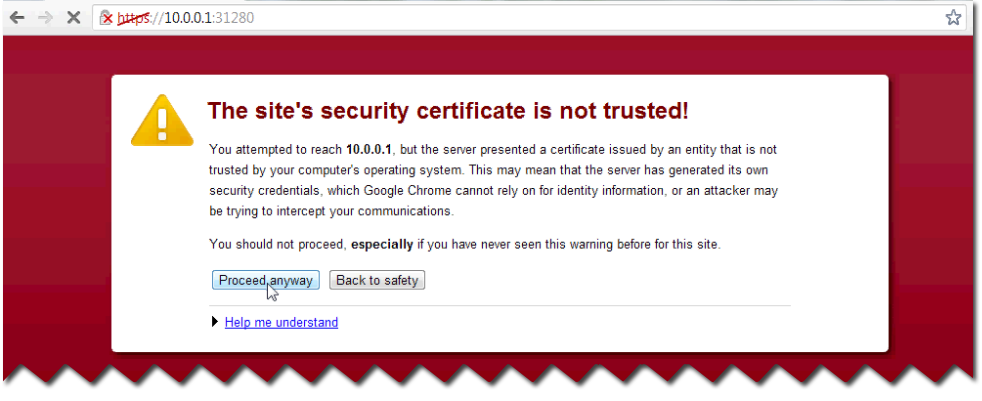
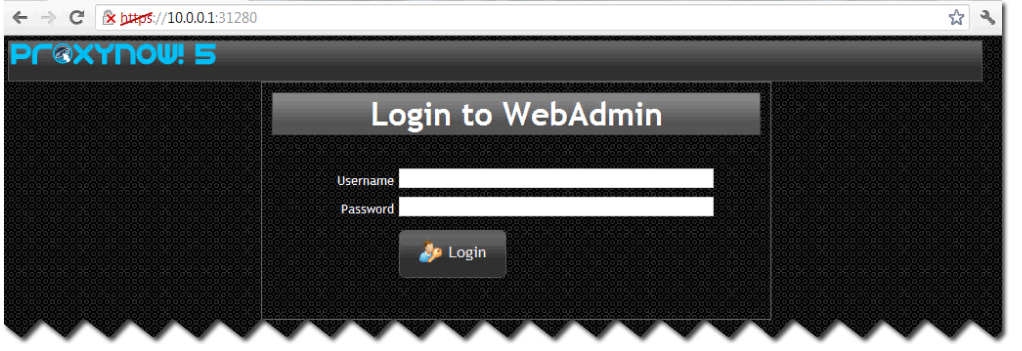
When installing ProxyNow! for the first time, the default IP is 192.168.111.111. The web admin can be accessed using the address:
https://192.168.111.111:31280
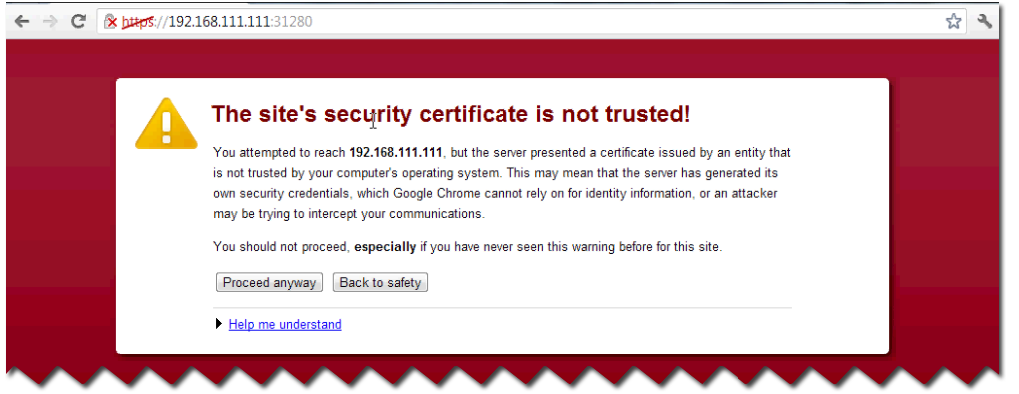
And the protocol used is HTTPS (not HTTP). You probably will get a warning as above, saying that ‘The site’s security certificate is not trusted!”. This is because the certificate that is used for the web admin is self generated. But it is okay, you can proceed by clicking Proceed anyway. At least this will ensure that the traffic for the web admin is encrypted.
Upon the first time accessing the web admin, you will see this wizard.
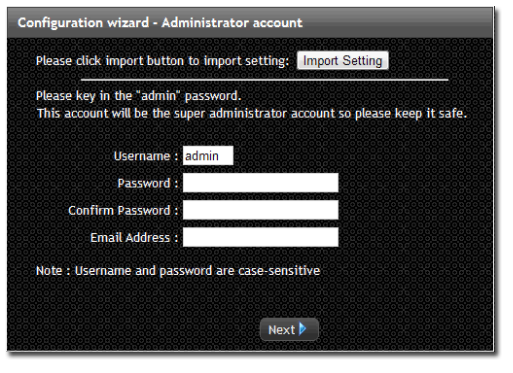
The wizard is designed to help you to quickly configure the basic setting to get your proxy up and running.
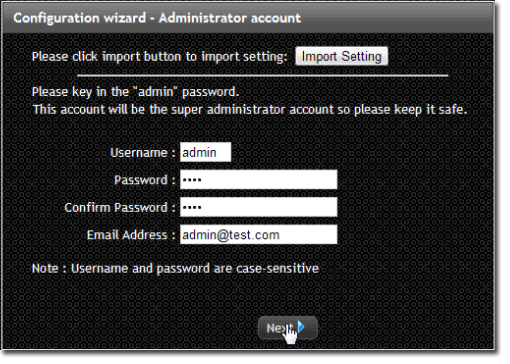
First, key in the administrator Password. Ensure that this password is strong by combining uppercase and lowercase letters, numbers and symbols. Do not lose this password because without it, you won’t be able to go back in to the web admin.
Note: Also know that the password is case sensitive.
You can also configure the Email Address of the administrator.
This email address is used for few purposes:-
1. The email that is displayed on the blocked messages
When the user try to surf the internet and the pages is not authorized or is filtered, they will get a warning and at the bottom of the page, this email address will be displayed so that they can contact the administrator for assistance.
2. Sending Notifications
This email address is also used for the purpose of receiving notification if something is wrong with your ProxyNow!. Such as if the license is about to expire.
There is also an option on the top here for you to import setting
This is used if you have previously exported setting from another installation of ProxyNow! 5.
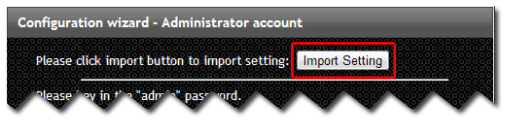
If you already have such a setting file, you can just reimport back in to quickly set up the ProxyNow! 5.
Note: Currently there is no way to import settings from ProxyNow! 4 (or before) into ProxyNow! 5. You will need to reconfigure from scratch
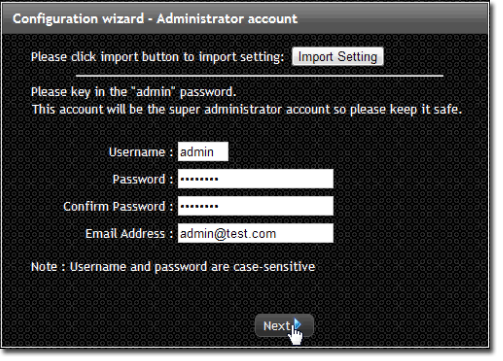
Once done, click Next.
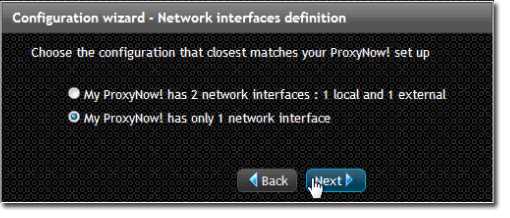
The next step allows you to configure the network interfaces. The wizard caters for the common scenario of either 1 or 2 network interfaces. If you have more than 2, just select "My ProxyNow! has 2 network interfaces: 1 local and 1 external". You can define those additional interfaces manually once the wizard has completed.
You can define those additional interfaces later on in the web admin
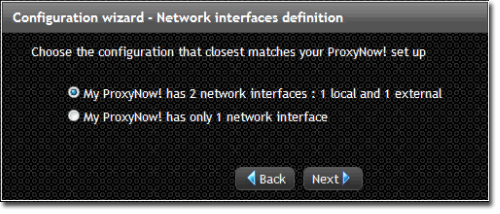
Click Next to proceed.
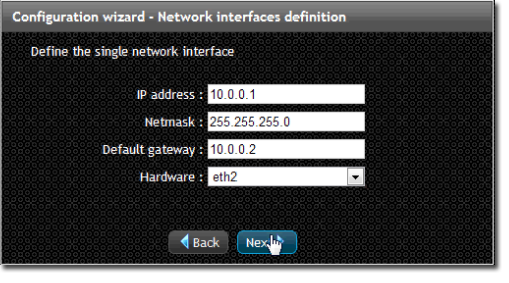
As you can see there is a Local interface and External interface.
Fill in your local interface information. This is all based on your network setup.
Choose the hardware information correctly.
So for External interface, put in your external address.
Note that for the external interface there is a Default gateway, so this is normally your Internet router.
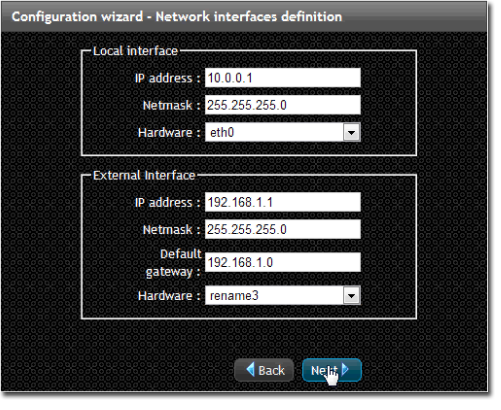
Choose the hardware, which is basically the network card and then click Next.
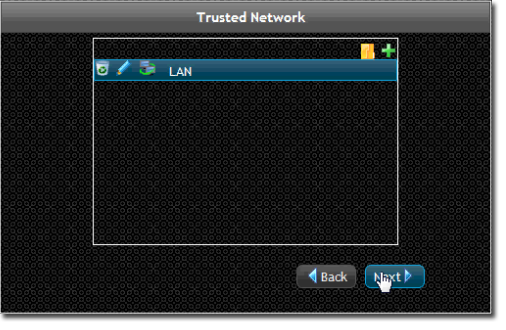
Next, specify the Trusted Network.
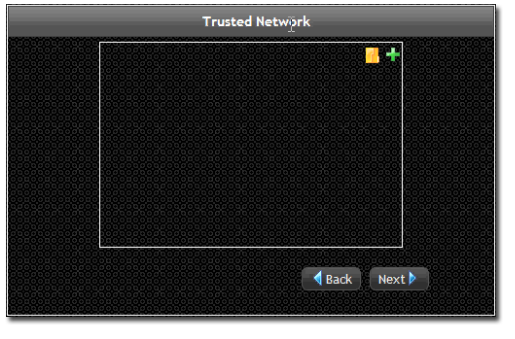
The trusted network is the list of IP addresses that are allowed to go out to the Internet via this ProxyNow!.
So normally here you would specify your local area network IP range. Note that any other IP which does not fall under the trusted network will not be able to go to the Internet through this ProxyNow!.
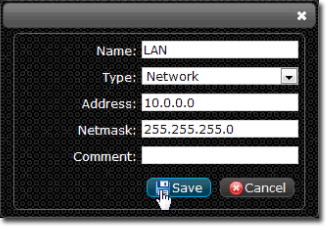
So, click on the + button

Give it a Name.
The Type, please ensure the type is Network because we are specifying the whole network range.
Please specify your trusted network. In the Address, you specify your IP range.
Put in your comment if you want.
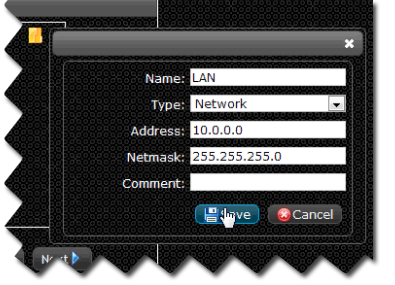
Once done, click Save
You can specify multiple trusted network if you have more than 1 network range in your LAN.
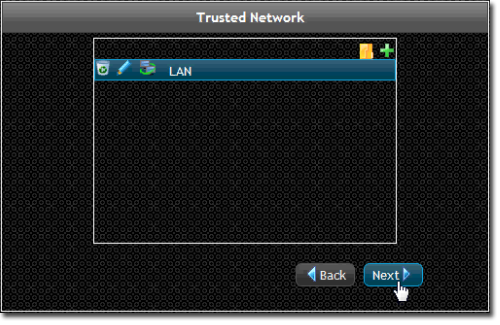
After you are done with the trusted network, click Next to proceed.
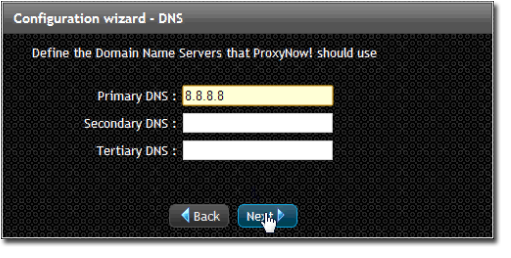
Next we will be specifying the DNS (Domain Name Server) that the ProxyNow! will use .
So, we need to specify at least 1, and the maximum we can specify is 3 different DNSes.
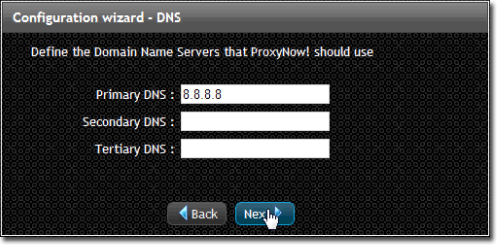
Click Next to proceed.
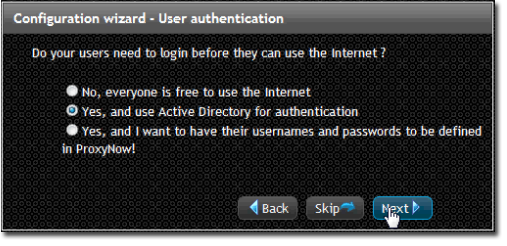
Next is user authentication. We have three options here.
1. The first option basically has no authentication. That means anyone is allowed to use the Internet without keying in any username or password
2. The Second option allows you to integrate the authentication with Active Directory server. So if your network have Active Directory, you can choose this option. With the Active Directory, the user will be able to surf the Internet without having to login with ProxyNow!. This is because their PC already has been authenticated with Active Directory when they start up the PC. Normally when they start up the PC, they will need to login to Windows and when they surf the Internet, ProxyNow! will be able to automatically detect their user information by communicating with Active Directory. So this way, the user does not need to login when they want to surf the Internet. The authentication will be done automatically behind the scene.
3. The third option, the usernames and passwords for the users are defined inside ProxyNow!. So that means we create the user account inside ProxyNow! and the password is all controlled inside ProxyNow!. So, when the user wants to surf the Internet, they will be prompted for the username and password.
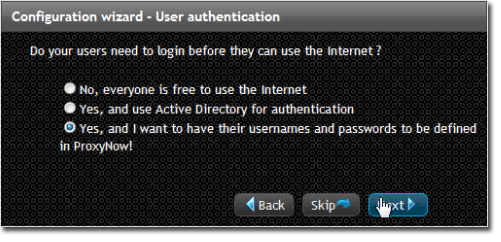
Click Next
In the Configuration wizard – User authentication step, you can key in the accounts of the users you want to create.
Alternatively, you can cut and paste if you have already have your user list in the form of a CSV, or Comma-Separator Value file. So the idea of CSV is that you have the entire user listed line by line.
If you look under the Import Setting, you will see:
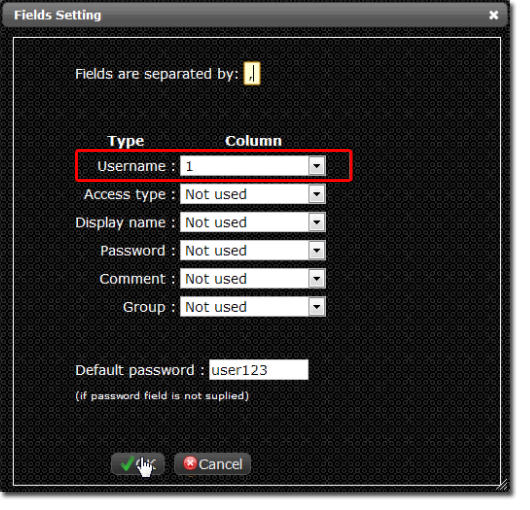
We can define how the user list is specified. So first of all, you can choose to specify a different field separator if you wish.
As an example, we set Username in the first column
So if you check back here, you will notice that we will need to supply the Name

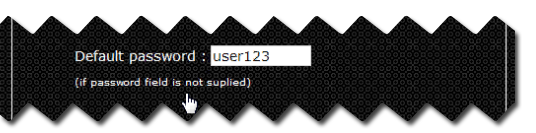
The password will be automatically be user123
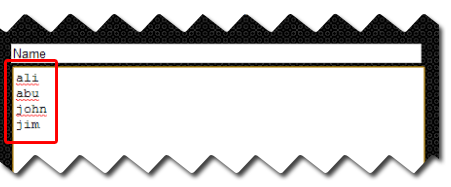
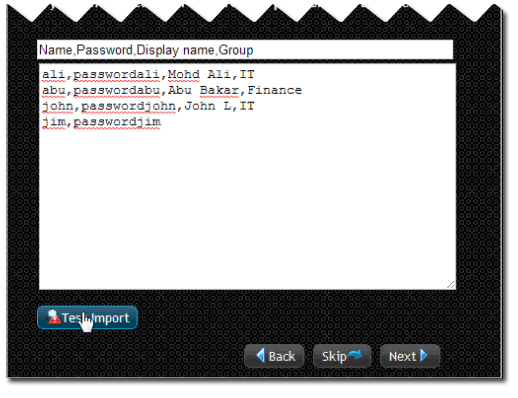
So let say I put in ali, abu, john, jim as the user account name.
We can test the information by clicking Test Import to see whether it is correct before we proceed. So in this case, everything is correct with no errors.

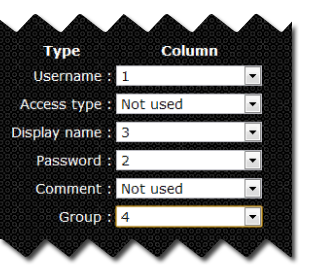
If you wish to specify our own password, let say the Password is the 2nd column, Display name in column 3 and the Group in column 4.
Note: The Display name is the full name of the user. Different from the username, Username is the account name. Group is something like department (Marketing department, Finance department etc).
You can change the default password here.
Now, ProxyNow! is expecting Username, Password, Display name and Group.
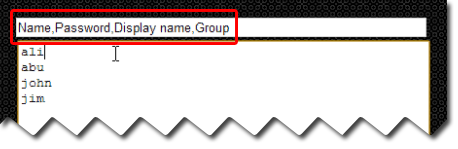
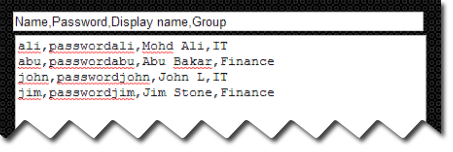
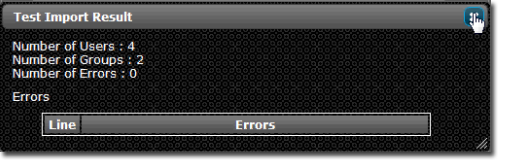
Let's say we test it by key in the information as below and click on the Test Import.
3 users are successfully detected and 2 groups are also been detected, but there is 1 error and that was in line 4 where the fields count was not enough.
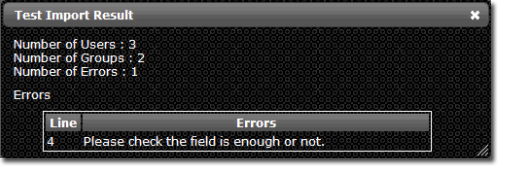
So ProxyNow! is expecting four fields. It is always good to check by clicking on the Test Import button before you proceed to the next step.
Once done, click Next
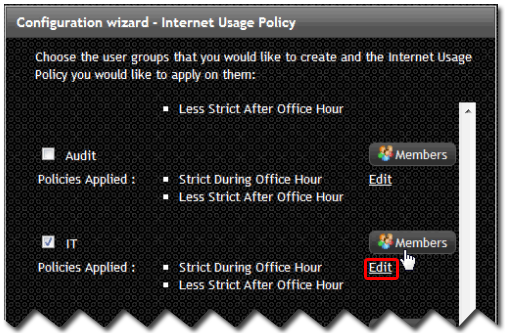
The last step allows you to specify the Internet Usage Policy.
In other words, what kind of control we want to enforce on these users.
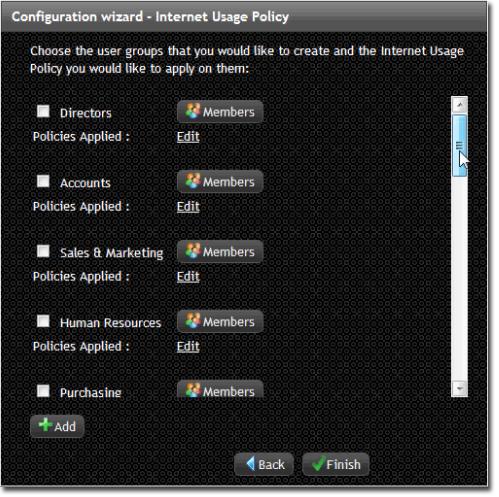
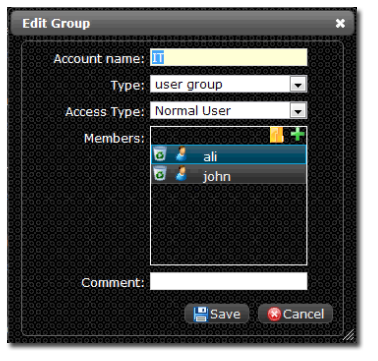
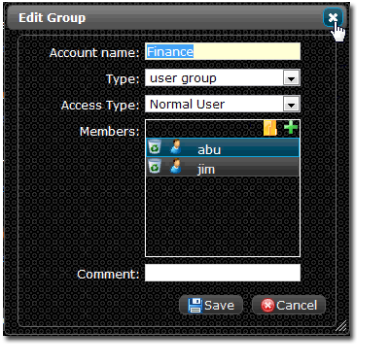
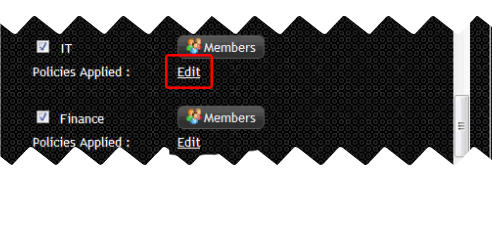
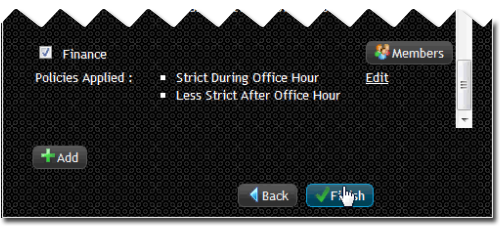
For example, we might have two different departments, one is IT and the other one is Finance. This is as how we defined it just now.
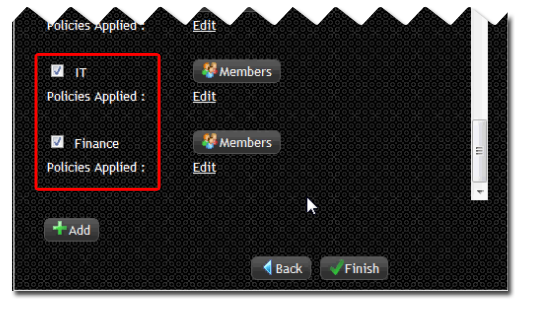
We can check the members of the groups by clicking on the Members.
So, this is correct, ali and john under IT and abu and jim under Finance.
Now for the policy to be applied to each group, we can specify it by clicking the Edit button.
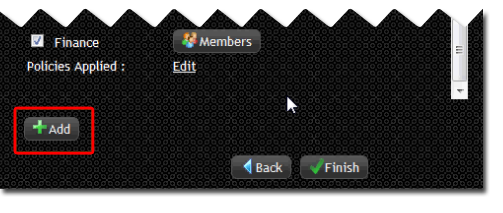
Click + Add
So for example, we can define the policy our own. Example, Poweruser for the IT department
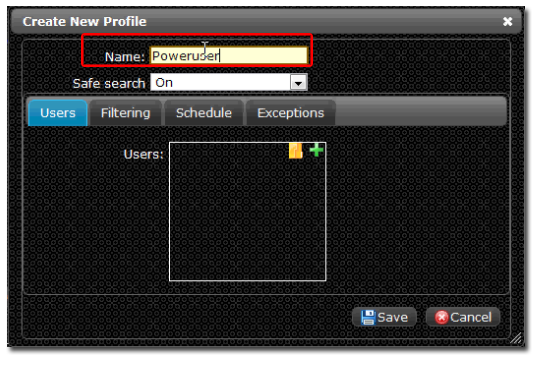
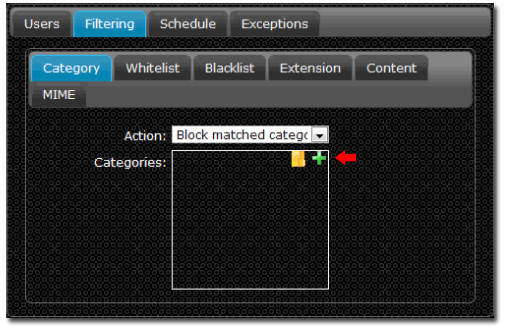
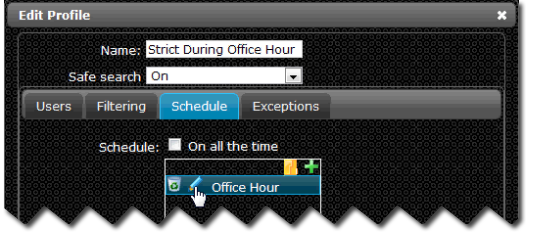
And in the Filtering tab, we can specify what is the category that we want to block.
However, ProxyNow! also comes with its own template of profiles to make it easy for you to specify the Internet usage policy for the users.
So, for example for the IT department, click on the Edit button, then you can choose which profile you want to apply for this particular group/department.
In the Profile List, we have different kind of profile/templates for you to choose from.
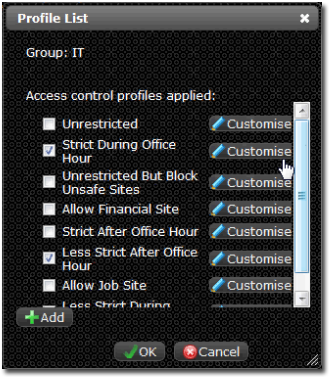
Unrestricted – User are able to access to any sites, nothing is blocked
Strict during office hour - The main profile that we have. During office hour, the access for Internet for the users will be strict. All office unrelated stuff, all the things that are deemed to be unproductive, like social media, streaming will be blocked
Unrestricted but block unsafe sites – Allows user to access everything, except sites which contain viruses and malware. This is to protect users from security treats
Allow financial site – Same as strict during office hours but financial sites, like online banking, are allowed.
Strict after office hour
Less strict after office hour - After office hour we can set it to less strict, so the users are able to access the sites that they wish
Allow job site - Same as "Strict during office hour" but HR related sites such as job search sites are allowed.
Less strict during office hour - Even during office hours, site deemed as improductive, such as social media , are permitted
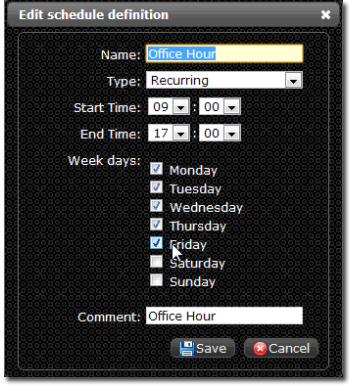
To set the office hours, click on the Customise button.
The default will be Monday to Friday 9:00am – 5:00pm
With these profiles, it makes it easier for you to define the basic configuration/policy for your users.
So for each department, you can define different types of access.
For example, normally for directors, we give them unrestricted access but block them from unsafe sites.
For the Account department, during office hours is strict, after office hours is less strict but will be allowed financial sites.
So, once you are happy with the policies, you can click Finish
Note: You can specify multiple profiles for each group. Should there be a clash, the order of the profiles will play an important role with the profile at the top having higher priority.
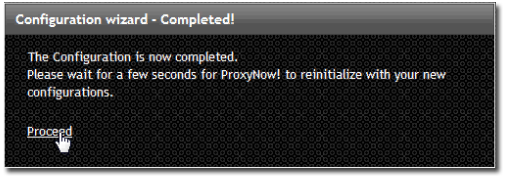
So once you have finished, you will see this notice below.
Click Proceed to go to the new login page.
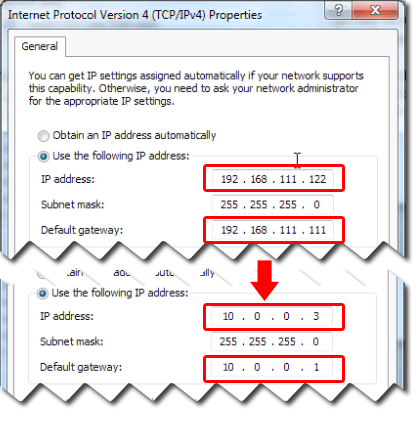
But one thing you need to remember is that, after you gone through the wizard, the IP is no longer the same, you need to access via the new IP, you probably want to make sure that your PC can also ping the new IP.
So in this case, it is trying to connect to the new IP that has been configured, during the wizard just now which is IP: 10.0.0.1:31280
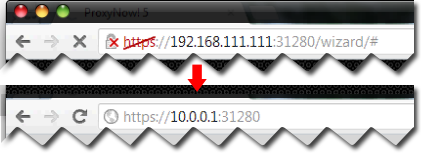
However the PC in this example is still using an IP in the old IP range (192.168.111.0/24). The PC's IP needs to be changed to an IP within the new IP range (10.0.0.0/24) in order to access the web admin.
So bare in mind that after you had configured the ProxyNow! through the wizard, so please make sure that you can ping the new IP.
To change the IP, go to your Network properties | Internet Protocol Version 4 (TCP/IPv4) | Properties |
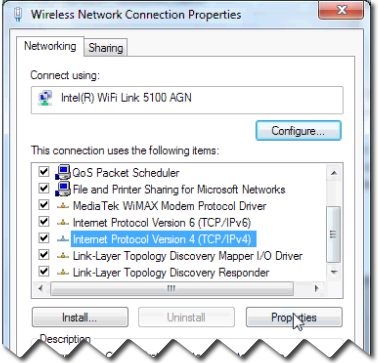
Change the IP address and default gateway
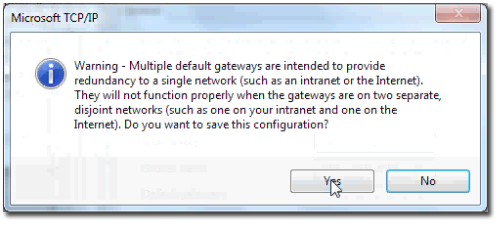
If you saw this pop up, just click Yes
So now you can access the ProxyNow! using the account that you just created.
So this is basically end of the configuration using the wizard.

Integrating with Active Directory
Of course if you want to integrate Active Directory with ProxyNow! the options in the wizard just now will be slightly different.
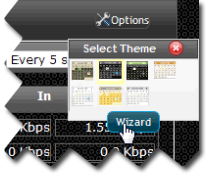
For you to access to the wizard again.
Go to Options (top left corner) | Wizard
Do note that when you return to the wizard again, all the settings will be reconfigured.
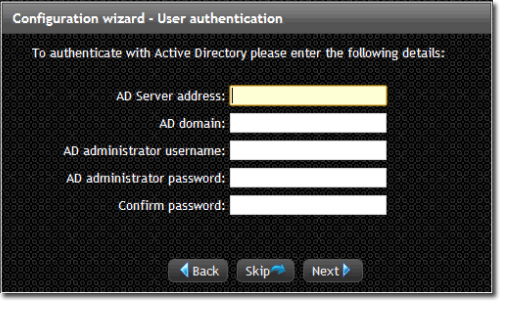
This is the part where we select ‘use Active Directory’
For this purpose, you need to key in the necessory information. Fill in the Active Directory (AD) Server Address, AD domain, AD Administrator username and AD Administrator password.
Click Next and that will complete the configurations.
For a longer discussion on integration with Active Directory, please see XXXX (link to the upcoming Active Directory configuration section.
So that’s is the only difference between using Active Directory or storing the users in ProxyNow!.
Copyright © 2012 www.ProxyNow.com.my