.png)
Setting System Settings
If you are configuring MailNow! 5 to use with third party hosting service, there are few things that you need to do upon completion of the First Time Configuration Wizard. Obviously in this kind of setup, you do not have any fixed IP address. So, you need to use a third party hosting service to perform 2 functions in relation to your mailing.
Storing your mails and providing a POP3 account which you use to download emails from their servers. In terms of POP3 accounts, there are 2 configuration of the hosting server; first is to have one individual POP3 account for each email user on your domain; or to have one single master account which is also known as Virtual POP3 (CATCH-ALL) account. So if you are using the Virtual POP3 account, there is an option that need to be enabled later on in MailNow! 5.
The advantage of using a single master account is that you do not need to create so many accounts. One single account could be used to receive all mails for all the users through this single account. MailNow! 5 then will connect to the server and download the mails and eventually distribute them among the correct recipients in your company. While in using individual POP3 account, for each user, you need to go to the hosting server and create a POP3 account for that particular user and then create the same user in MailNow! and configure the POP3 download information so MailNow! 5 could download the mails. So we could assume that using individual POP3 account will require more work and configuration. However, the disadvantage of using Virtual POP3 is that, the Bcc address field may not work properly on some scenarios.
To configure the Virtual POP3 on MailNow! 5, you can create a special user which is just responsible for downloading. After creating the user, select the user and go to User Settings choose POP3 Downloads from the sub-tree. You need to get some information about the POP3 server from the hosting server which is comprised of:
· POP3 server address (IP Address or hostname)
· Account name: Example:(pop3@smith.com)
· Passwords
To do a POP3 download setting, click on Add New and in the window opened, if you intend POP3 to start downloading as soon as you configured the settings, check the Enable The Downloading Of This POP3 Account checkbox. For User Name and Password and Server enter those that you received from the hosting company. In the Port field, put 110 (POP3 port number). Somehow, if your company has provided you a different port number for POP3, you need to provide it in the port field. If the hosting server requires you to connect using Secure connection, you need to check the SSL checkbox. Next you need to configure whether you like your mails to be removed from the server upon downloading or you want a copy of the mails to remain on the server. Next item is Parse Messages' Headers To Get The Recipients Address which needs to be activated if you are using a Virtual POP3. Refer to the screenshot below:
.png)
.png)
Finally click on OK to store the changes. If individual POP3 is used, for each user these settings should be configured. To configure the frequency to download mails from POP3 server, you need to navigate to Scheduler under System Settings and select POP3 Downloads. By default MailNow! 5 will download mails every 15 minutes.
.png)
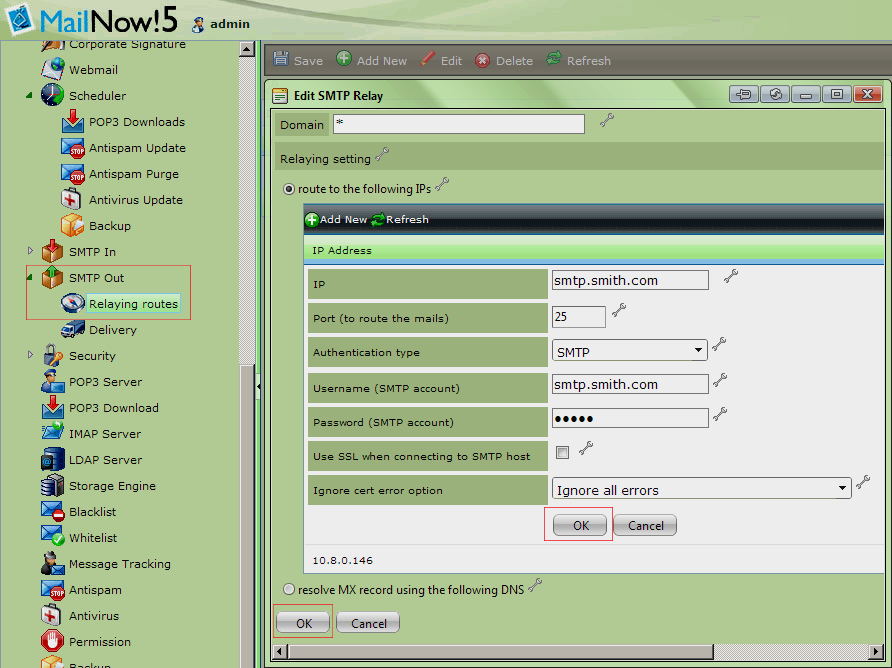
Allowing you to send out your emails to the Internet via their SMTP server. To configure MailNow! 5, navigate to Relaying Routes under SMTP Out. This section instructs MailNow! how to deliver the mails. The first field is the Domain Name which is recipient domain, and relaying field explains how the mail should be delivered to recipients. So click on Add New to start the configuration. MailNow! 5 can use two different methods to relay messages. One is to use DNS servers to resolve the MX record of the destination domain. This way, once MailNow! 5 has the IP address or the MX record of the destination, it will connect to that server and will deliver the mail. Alternatively, you can ask MailNow! 5 to Route to the following IPs to route the out-going mail to a particular address. This is the configuration to have if you are using a third party SMTP server that is provided by the hosting company that you are using. So click on the radio button to choose this option, and click on Add New button. So before we continue, let's see what information will normally be provided by the hosting company to configure SMTP:
· SMTP server address
· Username
· Password
So back to MailNow!, in the IP field, you can either enter the IP address or the hostname. For most cases, SMTP port is port 25. For authentication types, normally you use SMTP, although the option “POP before SMTP” is used for situation that hosting company requires you to connect to a POP3 server before you could send emails. Next enter your user name and password provided by the company. Check SSL checkbox if you are required by the company to use secure connection. Please take note that if you use SSL, in most cases companies use ports other than the default which is port 465. Finally click on OK to store the changes, and click on Save button. Refer to the screenshot below:
.png)
.png)